
Key takeaways
- Turn off the water supply valve and unplug the bidet (for electronic models).
- Flush the toilet to empty the tank, then disconnect the bidet water line and T-valve.
- Disconnect the bidet hose and main water supply line from the T-valve
- Remove the bidet toilet seat from the mounting bracket with the quick-release button, if available.
Trust us—we love seeing more people get into bidets. When customers leave reviews talking about how switching to bidets has improved their bathroom routines, it makes our day.
We do realize that sometimes, you may need to remove your bidet toilet seat. There are plenty of reasons to do it: maybe you’re deep cleaning your bathroom, doing a full toilet upgrade, or moving out of your current place.
Whatever the reason may be, the good news is that it’s easy to uninstall a bidet toilet seat. For the most part, installing a bidet toilet seat is not that different than a regular toilet seat. The main difference is that a bidet will be hooked up to your toilet’s water line, and to a power outlet if it’s an electronic bidet.
Let’s walk through exactly how to remove your bidet toilet seat safely and easily. Please note that the steps below outline general steps for removing a bidet toilet seat. When possible, consult your bidet's user manual for specific steps and tips.
What tools do I need to remove my bidet seat?
Just like any DIY project, having the basic tools are essential. To remove your bidet toilet seat, here’s what you’ll want to have nearby:
- Adjustable wrench: Essential for loosening mounting nuts and water connections.
- Bucket and towels: Handy for catching and soaking up any water leaks.
- Screwdriver: For removing any screws from mounting hardware, remote holders, etc.
How do I remove my bidet toilet seat?
Removing your bidet toilet seat is a pretty straightforward process once you have everything ready. Here’s how it goes:
- Unplug your bidet from the power outlet.
- Turn off the water supply line.
- Flush your toilet.
- Find the bidet’s T-Valve.
- Undo the water line and bidet hose from the T-Valve.
- Undo the T-Valve from toilet tank.
- Undo the bidet hose from the bidet toilet seat.
- Remove the bidet toilet seat from the toilet.
- Remove the mounting plate.
If you have an electronic bidet toilet seat, do this step first. Make sure to keep the plug and outlet dry after unplugging.
Go under the toilet seat and find your water supply line. Find the water valve and turn it off. This stops the flow of water into your bidet and toilet tank, which will stop the water pressure and minimize leaks.
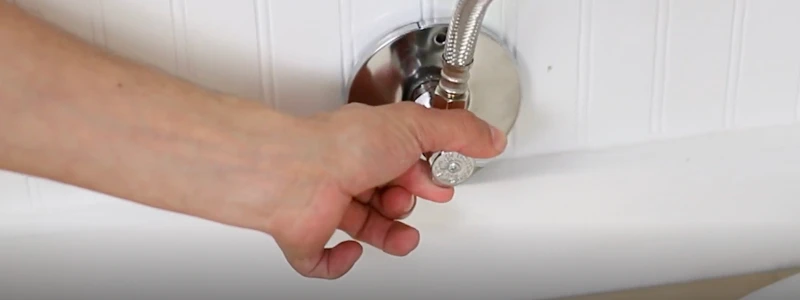
Be sure to hold the handle down to completely empty the tank. At this point, there should be no additional water coming into your system, but your bidet hose and main water line may still have some..
This valve diverts water from the main water supply to the bidet. It's called a T-Valve because it resembles the letter 'T', and you can find it under the toilet tank, connected to the toilet’s fill valve.
Once you find the T-Valve, it’s time to remove the main water line and bidet hose from it. The main water line is what supplies your toilet and bidet with water.
Place your bucket under the T-Valve to catch any residual water that will leak out. Then, locate and remove the main water supply line. This is the hose that connects from the wall to the bottom of the T-Valve. You may need to use your adjustable wrench for this step.
Use your towels to clean up the area and soak up any water that spills over.
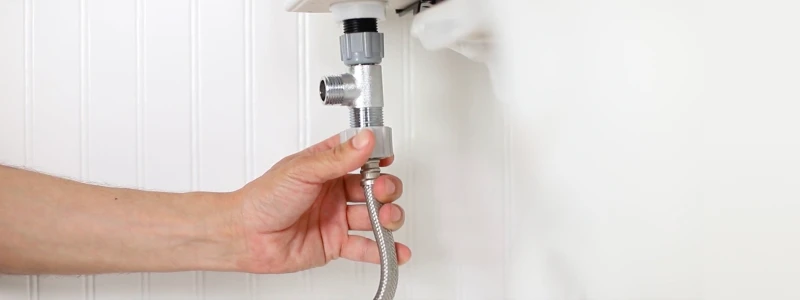
Before removing your seat, you'll need to remove the T-Valve, which is still attached to the bottom of your toilet tank. You can loosen it by hand—or an adjustable wrench if needed.
If you’re moving or will not be installing a new bidet, you can attach the water supply line directly back onto the toilet tank. But if you’re planning to install a new bidet, keep the supply line unattached.
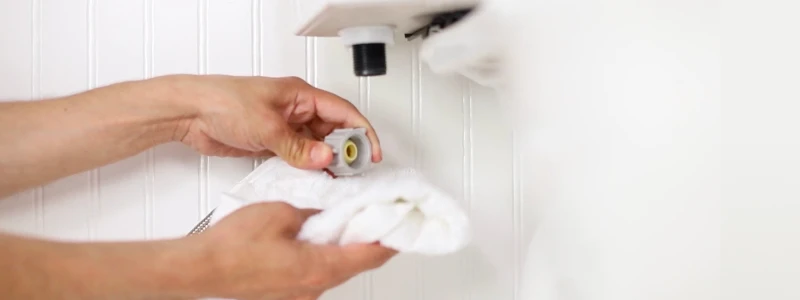
Unscrew the hose that is attached to the bidet. There may still be some water inside, so have your towel ready to mop up any leaks.
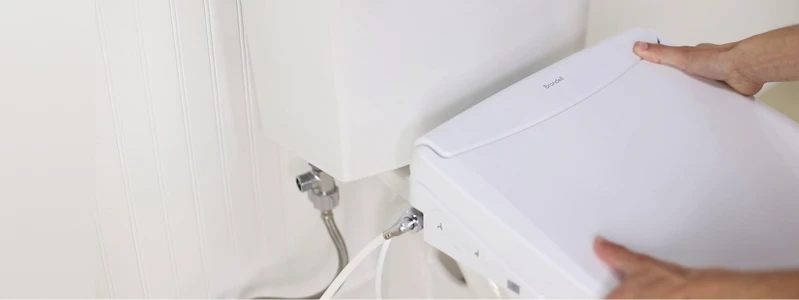
Bidet toilet seats typically come with a mounting bracket that allows them to quickly come off the toilet with the push of a button. If this is the case for your bidet, simply find and press the quick release button to detach the bidet.
From here, the only thing left to remove is the bidet’s mounting plate.
This is the hardware that attaches your bidet seat to the toilet. Most mounting plates are attached through the toilet seat bolt holes, just like a regular toilet seat.
Look under your toilet and find the nuts holding the mounting bolts in place. Manually loosen and remove the nuts, pull the bolts out from the top of the toilet, and remove the mounting plate.
Some units use rubber mounting anchors instead of nuts and bolts. In this case, simply remove the rubber anchors by unthreading the screw halfway, and firmly pulling upward. A pair of pliers may be helpful with this step.
Make sure you have all your hardware after removal, including any mounting brackets or washers that came with your unit. Consult your bidet toilet seat’s user manual for any specific parts and instructions on this process.
Congratulations! At this point, you’ve removed your old bidet toilet seat. Be sure to clean around the toilet bowl before you start your next project.
From here, you can reinstall your old toilet seat, or install a new attachment or electronic bidet toilet seat. Check your new product’s user manual for specific instructions.
As you can see, removing your old bidet toilet seat is easy. Whatever your reasons are for removing it, there’s no need to be intimidated if you have the right tools and you follow the instructions in the installation manual that came with your bidet. Now that you know how to do it, it’s time to get to work!